Deep Diving into Nyx, A Snapshot-based fuzzing

Last updated: 05/05/2024
Intro
I have been wanting to experiment with some fuzzers for quite some time, but I was simply not “ready” to jump into a completely different field yet and life has been busy for me…
Until recently, I finally made up my mind and decided to give it a shot. I figured the best way to learn fuzzing is to pick a existing fuzzer and dissect it, see what’s inside of the fuzzer and how it works. I picked kAFL, which is a snapshot-based fuzzer frontend that utilize modified QEMU (Quick Emulator) named QEMU-Nyx, modified KVM hypervisor named KVM-Nyx and Intel Processor Tracing (PT) to introduce another solution to fuzzing unique/complex targets.
I also highly encourage you to check out other fuzzers on the market that are targeting Windows binaries such as WinAFL, WTF.
There are no such one-fit-all fuzzer that will suit all your needs, so pick your poison wisely.
The Setup
DELL XPS 9510 Laptop (Intel Processor) running Ubuntu
1
2
3
4
5
LSB Version:    core-11.1.0ubuntu4-noarch:security-11.1.0ubuntu4-noarch
Distributor ID: Ubuntu
Description:    Ubuntu 22.04.4 LTS
Release:        22.04
Codename:       jammy
But in theory, any laptops with Intel Processor supports Intel PT and running a linux distro should work. Simply follow the guide in kAFL documentation to get started.
After setting it up, you should be able to use the Python-virtualenv environment and run:
1
2
3
4
5
6
7
8
9
10
11
12
13
(.venv) (base) kiwi@kiwi-XPS-15-9510:~/fuzz/kAFL/windows_x86_64$ kafl -h
usage: kafl [-h] {fuzz,debug,cov,gui,plot,mcat} ...

positional arguments:
  {fuzz,debug,cov,gui,plot,mcat}
    fuzz                kAFL Fuzzer
    debug               kAFL Debugger
    cov                 kAFL Coverage Analyzer
    gui                 kAFL GUI
    plot                kAFL Plotter
    mcat                kAFL msgpack Pretty-Printer
options:
  -h, --help            show this help message and exit
Clone & Compare
I figured the best way to learn what modification that the QEMU-Nyx has made on top of QEMU is to cloning both repos and compare all files that has been modified/added/deleted. To do so, I used a visual studio code extension Diff Folders (Extension ID: L13RARY.l13-diff)
NOTE: The Nyx QEMU is based off of QEMU 4.2.0, which you can find the in branch named
stable-4.2Here is the command line used to clone the repogit clone -b stable-4.2 https://github.com/qemu/qemu.gitfor QEMUgit clone https://github.com/nyx-fuzz/QEMU-Nyx.gitfor QEMU-Nyx
After that, should be easy to compare all the files that Nyx has added or modified, for example Capstonev4, Nyx folders appear as added folders

Where Can I Start?
Well, following my Debugging kAFL series, you know we have a example that we can debug and now it’s just a matter of stepping through the source code and learn some more about QEMU and Nyx (two bird with one stone).
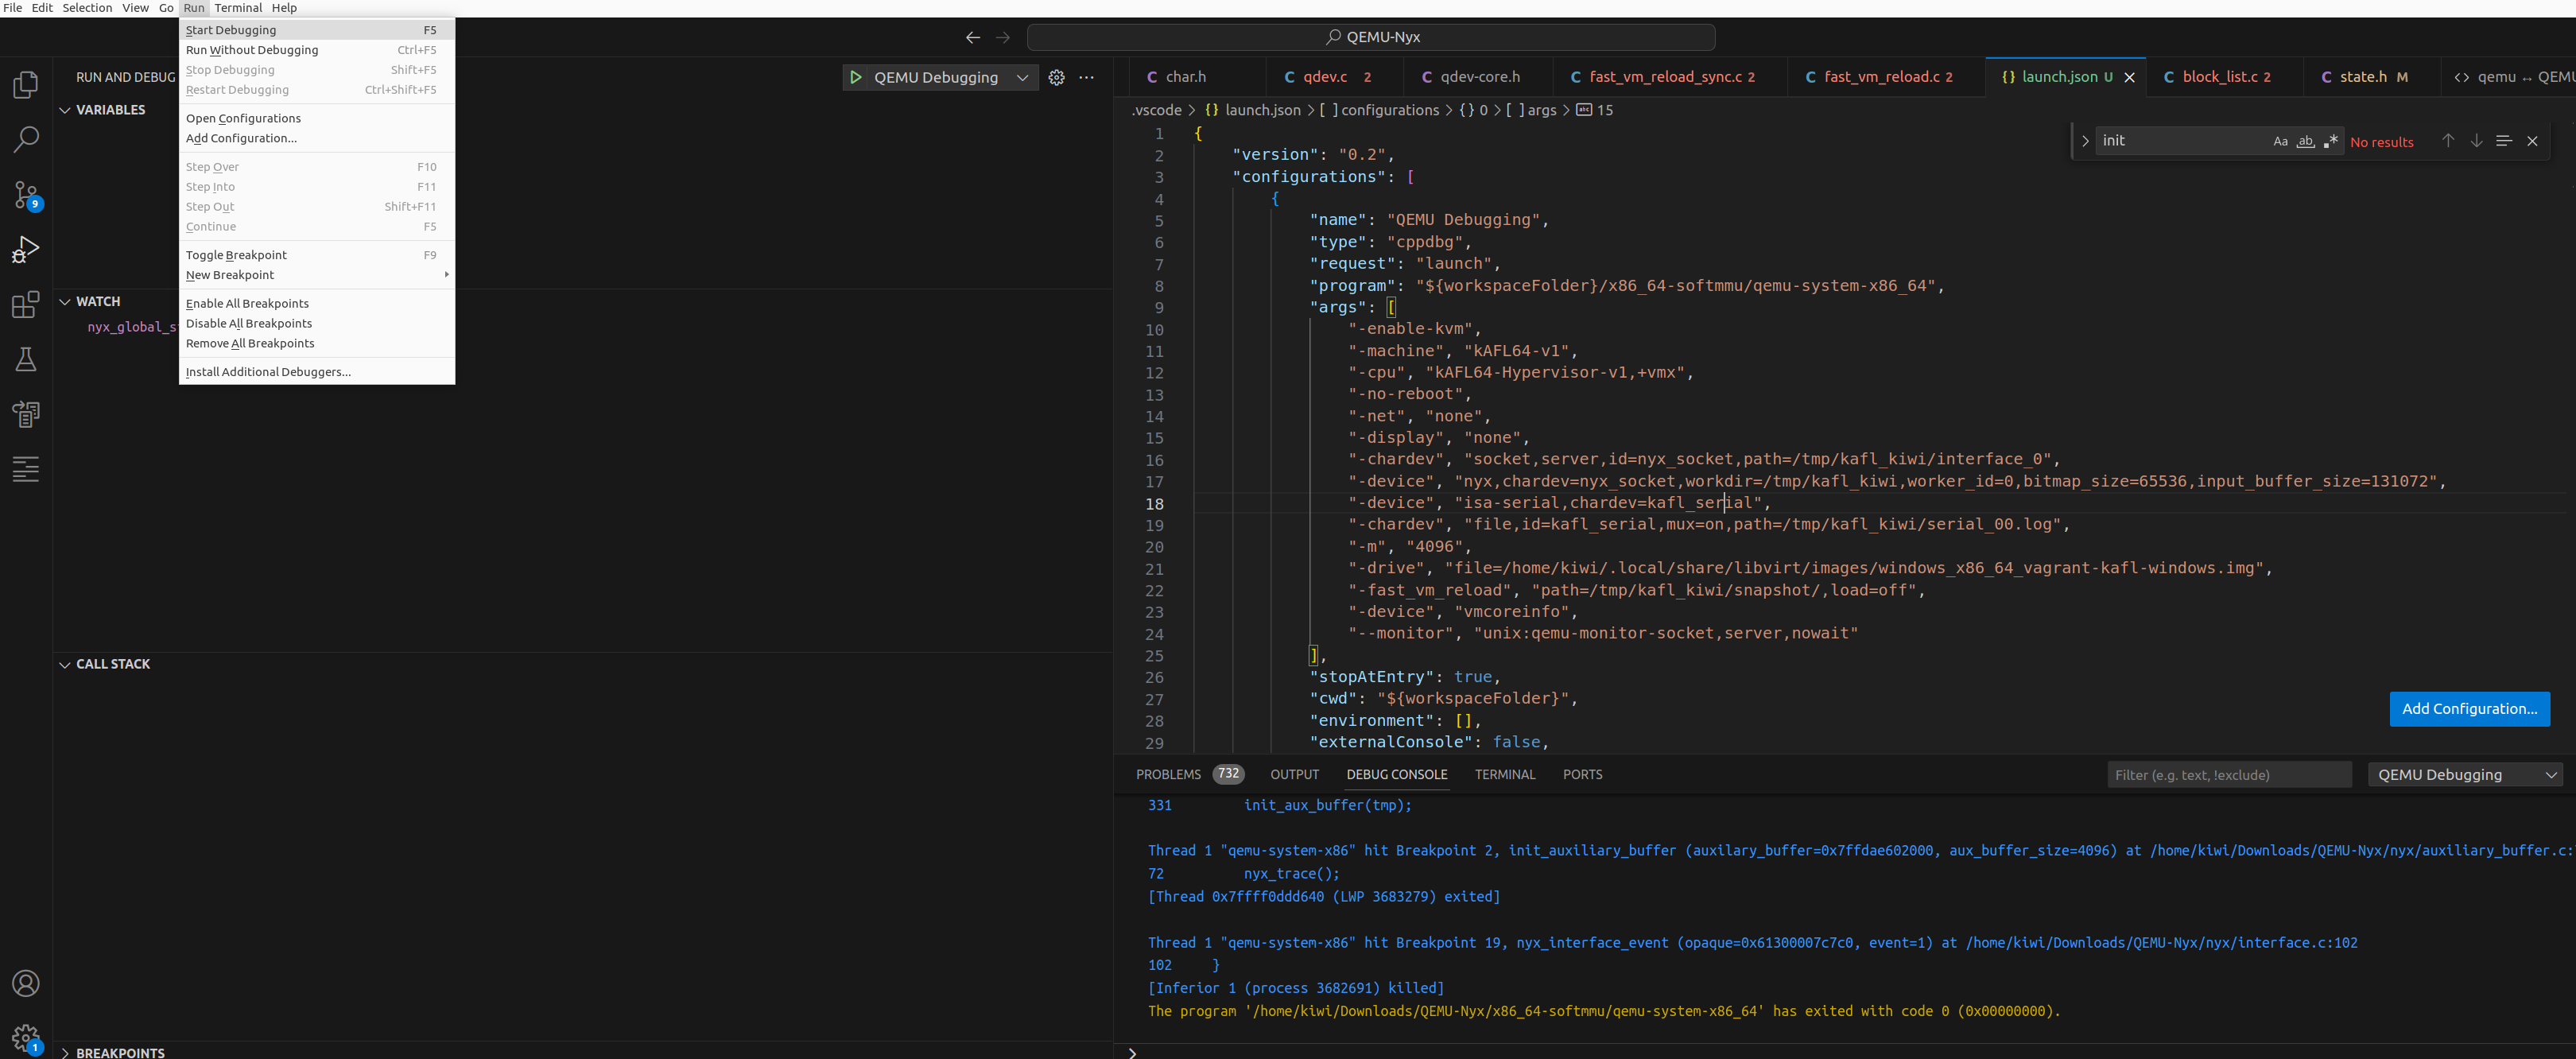
This time, I will not use GDB to debug but rather I will use VSCode to play on easy mode… The setup is quite simple, compile the QEMU-Nyx with
1
2
┌[kiwish-4.2]-(Downloads/QEMU-Nyx)-[git:qemu-nyx-4.2.0*]-
└> ./compile_qemu_nyx.sh debug_static
Adding a configuration file into VS Code is simple enough, ask ChatGPT to convert out previous GDB command line to VS Code configuration
1
2
3
4
5
6
7
8
9
10
11
12
13
14
15
16
17
18
19
20
21
22
23
24
25
26
27
28
29
30
31
32
33
34
35
36
37
38
39
40
41
{
    "version": "0.2",
    "configurations": [
        {
            "name": "QEMU Debugging",
            "type": "cppdbg",
            "request": "launch",
            "program": "${workspaceFolder}/x86_64-softmmu/qemu-system-x86_64",
            "args": [
                "-enable-kvm",
                "-machine", "kAFL64-v1",
                "-cpu", "kAFL64-Hypervisor-v1,+vmx",
                "-no-reboot",
                "-net", "none",
                "-display", "none",
                "-chardev", "socket,server,id=nyx_socket,path=/tmp/kafl_kiwi/interface_0",
                "-device", "nyx,chardev=nyx_socket,workdir=/tmp/kafl_kiwi,worker_id=0,bitmap_size=65536,input_buffer_size=131072",
                "-device", "isa-serial,chardev=kafl_serial",
                "-chardev", "file,id=kafl_serial,mux=on,path=/tmp/kafl_kiwi/serial_00.log",
                "-m", "4096",
                "-drive", "file=/home/kiwi/.local/share/libvirt/images/windows_x86_64_vagrant-kafl-windows.img",
                "-fast_vm_reload", "path=/tmp/kafl_kiwi/snapshot/,load=off",
                "-device", "vmcoreinfo",
                "--monitor", "unix:qemu-monitor-socket,server,nowait"
            ],
            "stopAtEntry": false,
            "cwd": "${workspaceFolder}",
            "environment": [],
            "externalConsole": false,
            "MIMode": "gdb",
            "miDebuggerPath": "/usr/bin/gdb",
            "setupCommands": [
                {
                    "description": "Enable pretty-printing for gdb",
                    "text": "-enable-pretty-printing",
                    "ignoreFailures": true
                }
            ]
        }
    ]
}
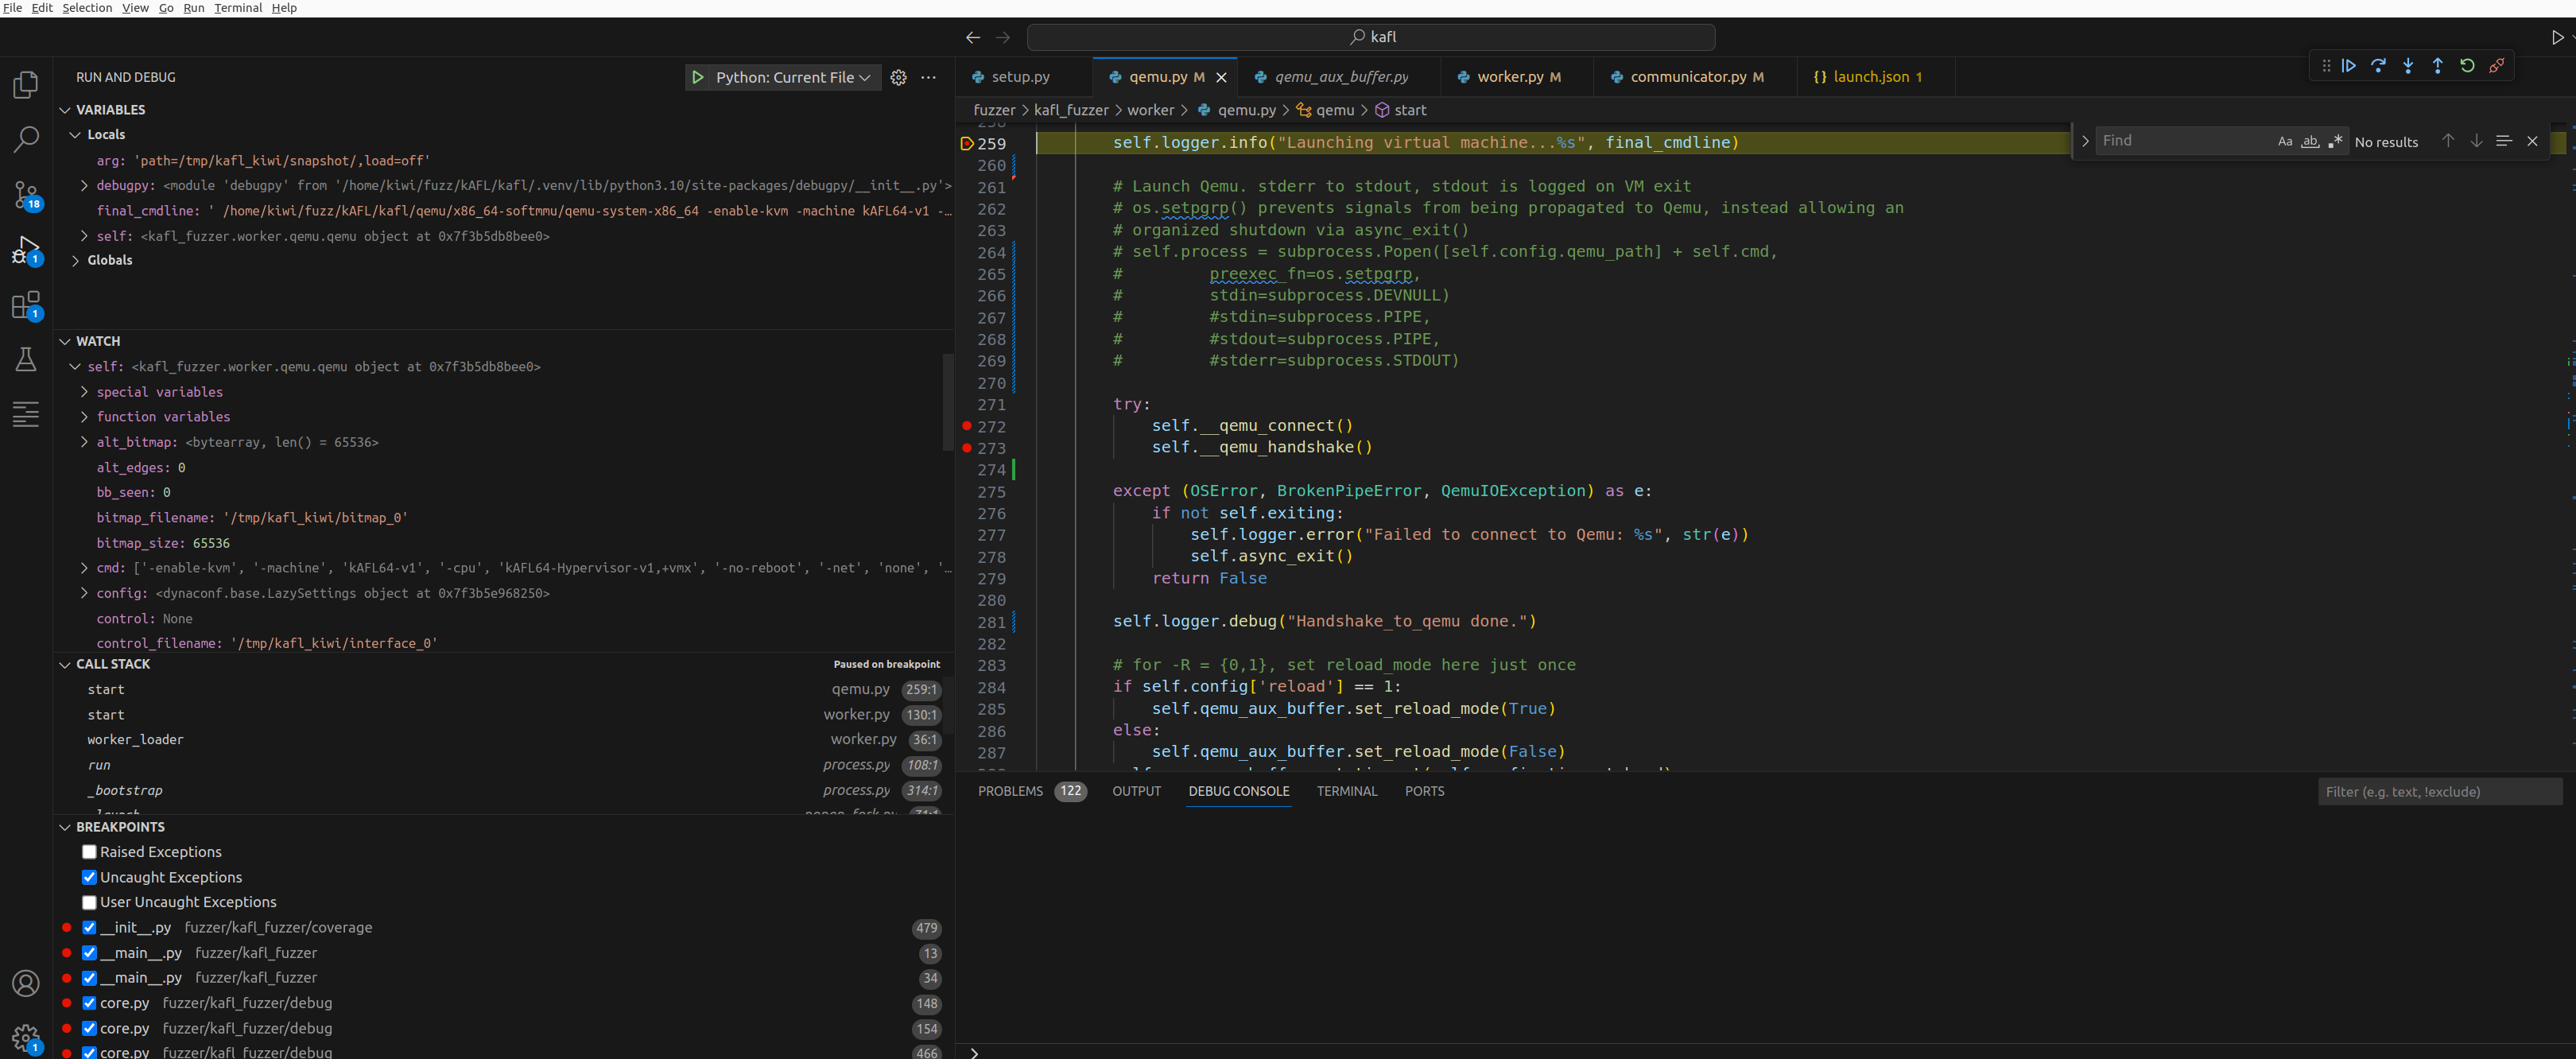
Okay, Client
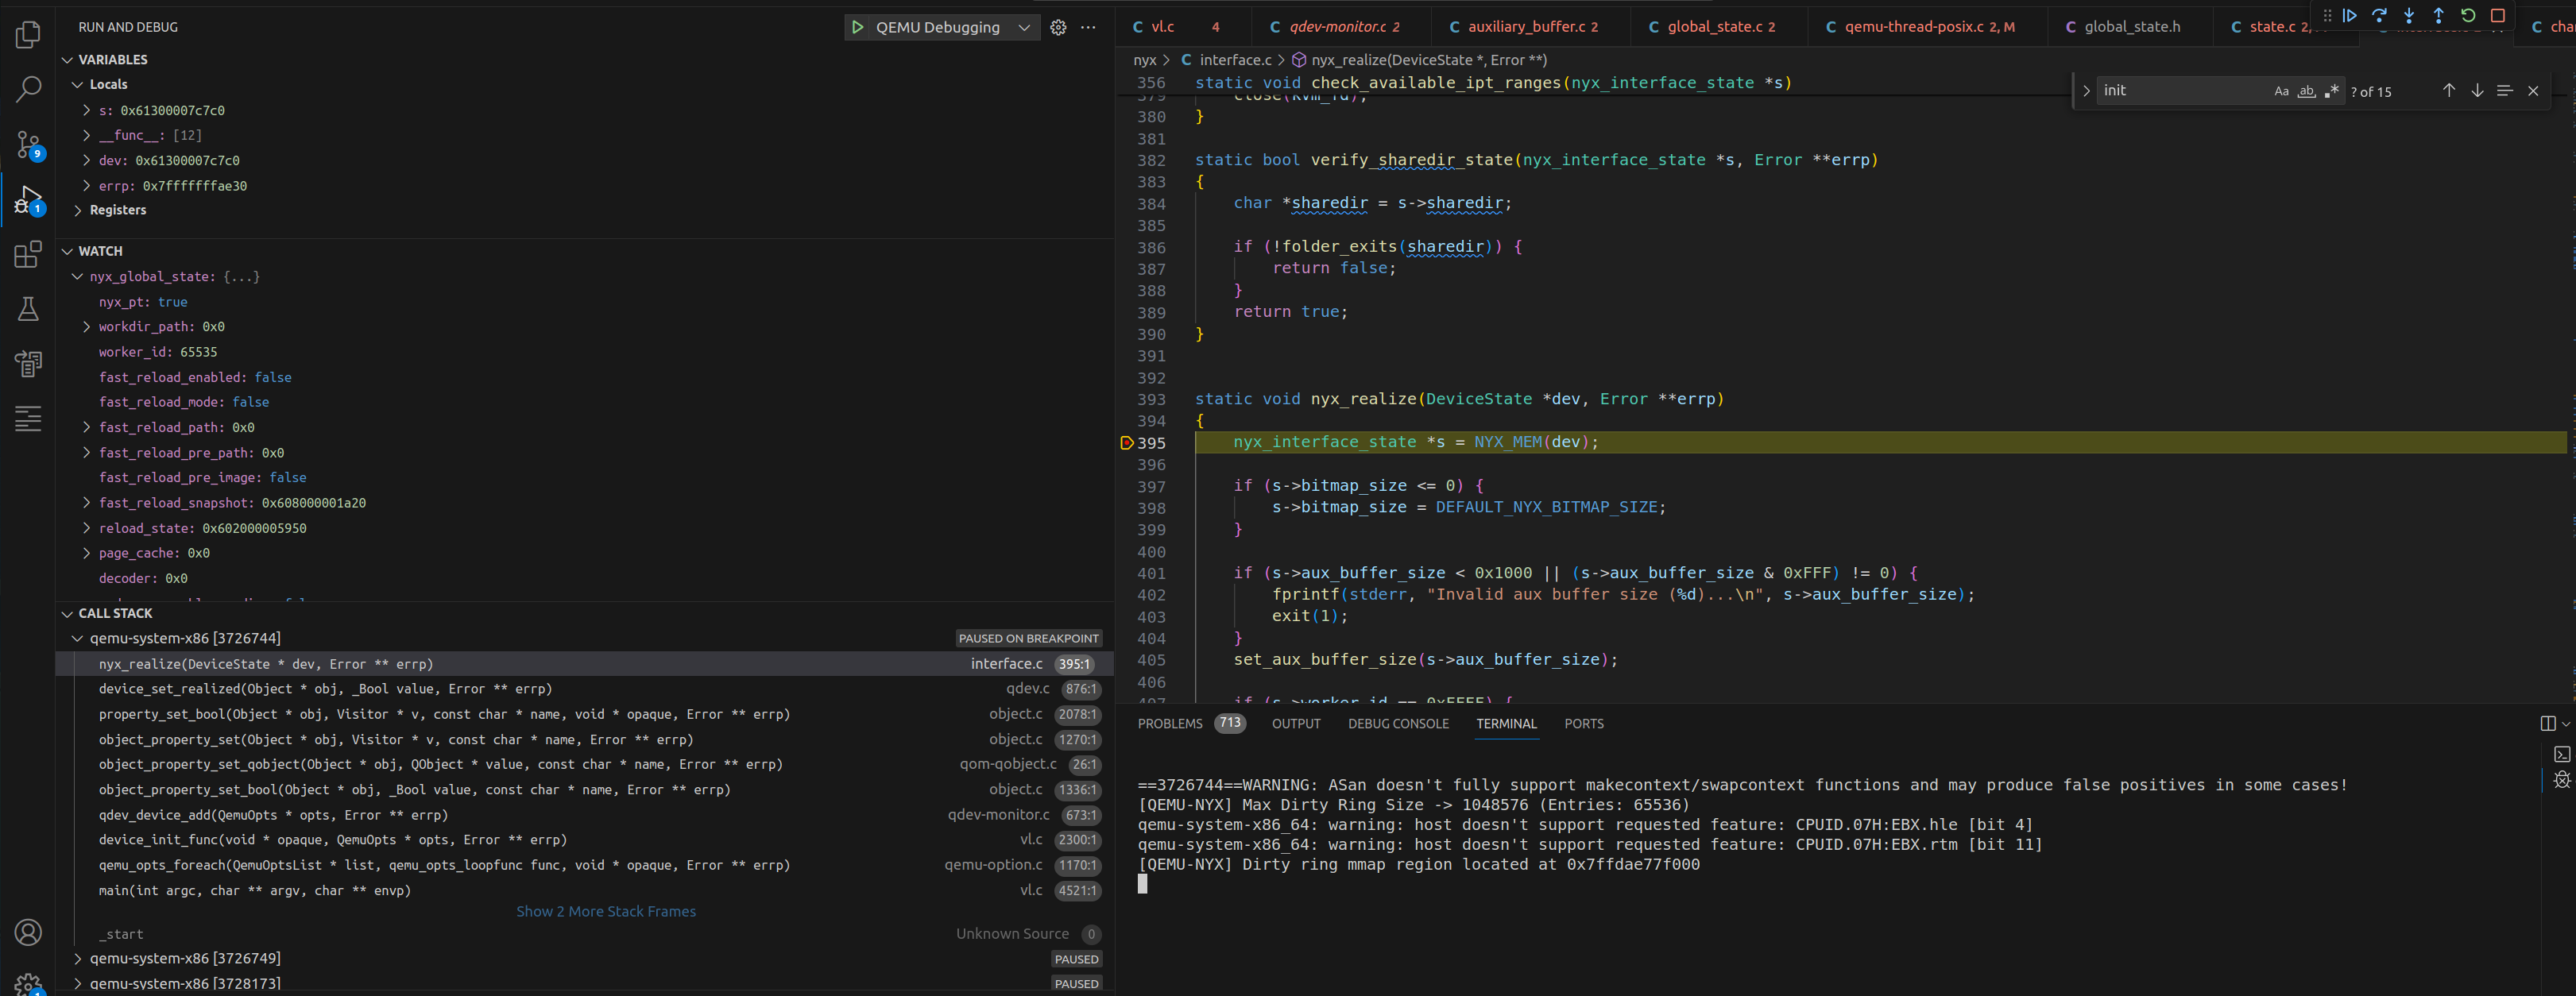
We can now run the QEMU-Nyx by starting the debug session, and set a break point at main() in vl.c
 In VSCode debug mode and we will now get all the symbol information and the ability to inspect variables within VS Code. Shoutout to Microsoft VSCode dev team!
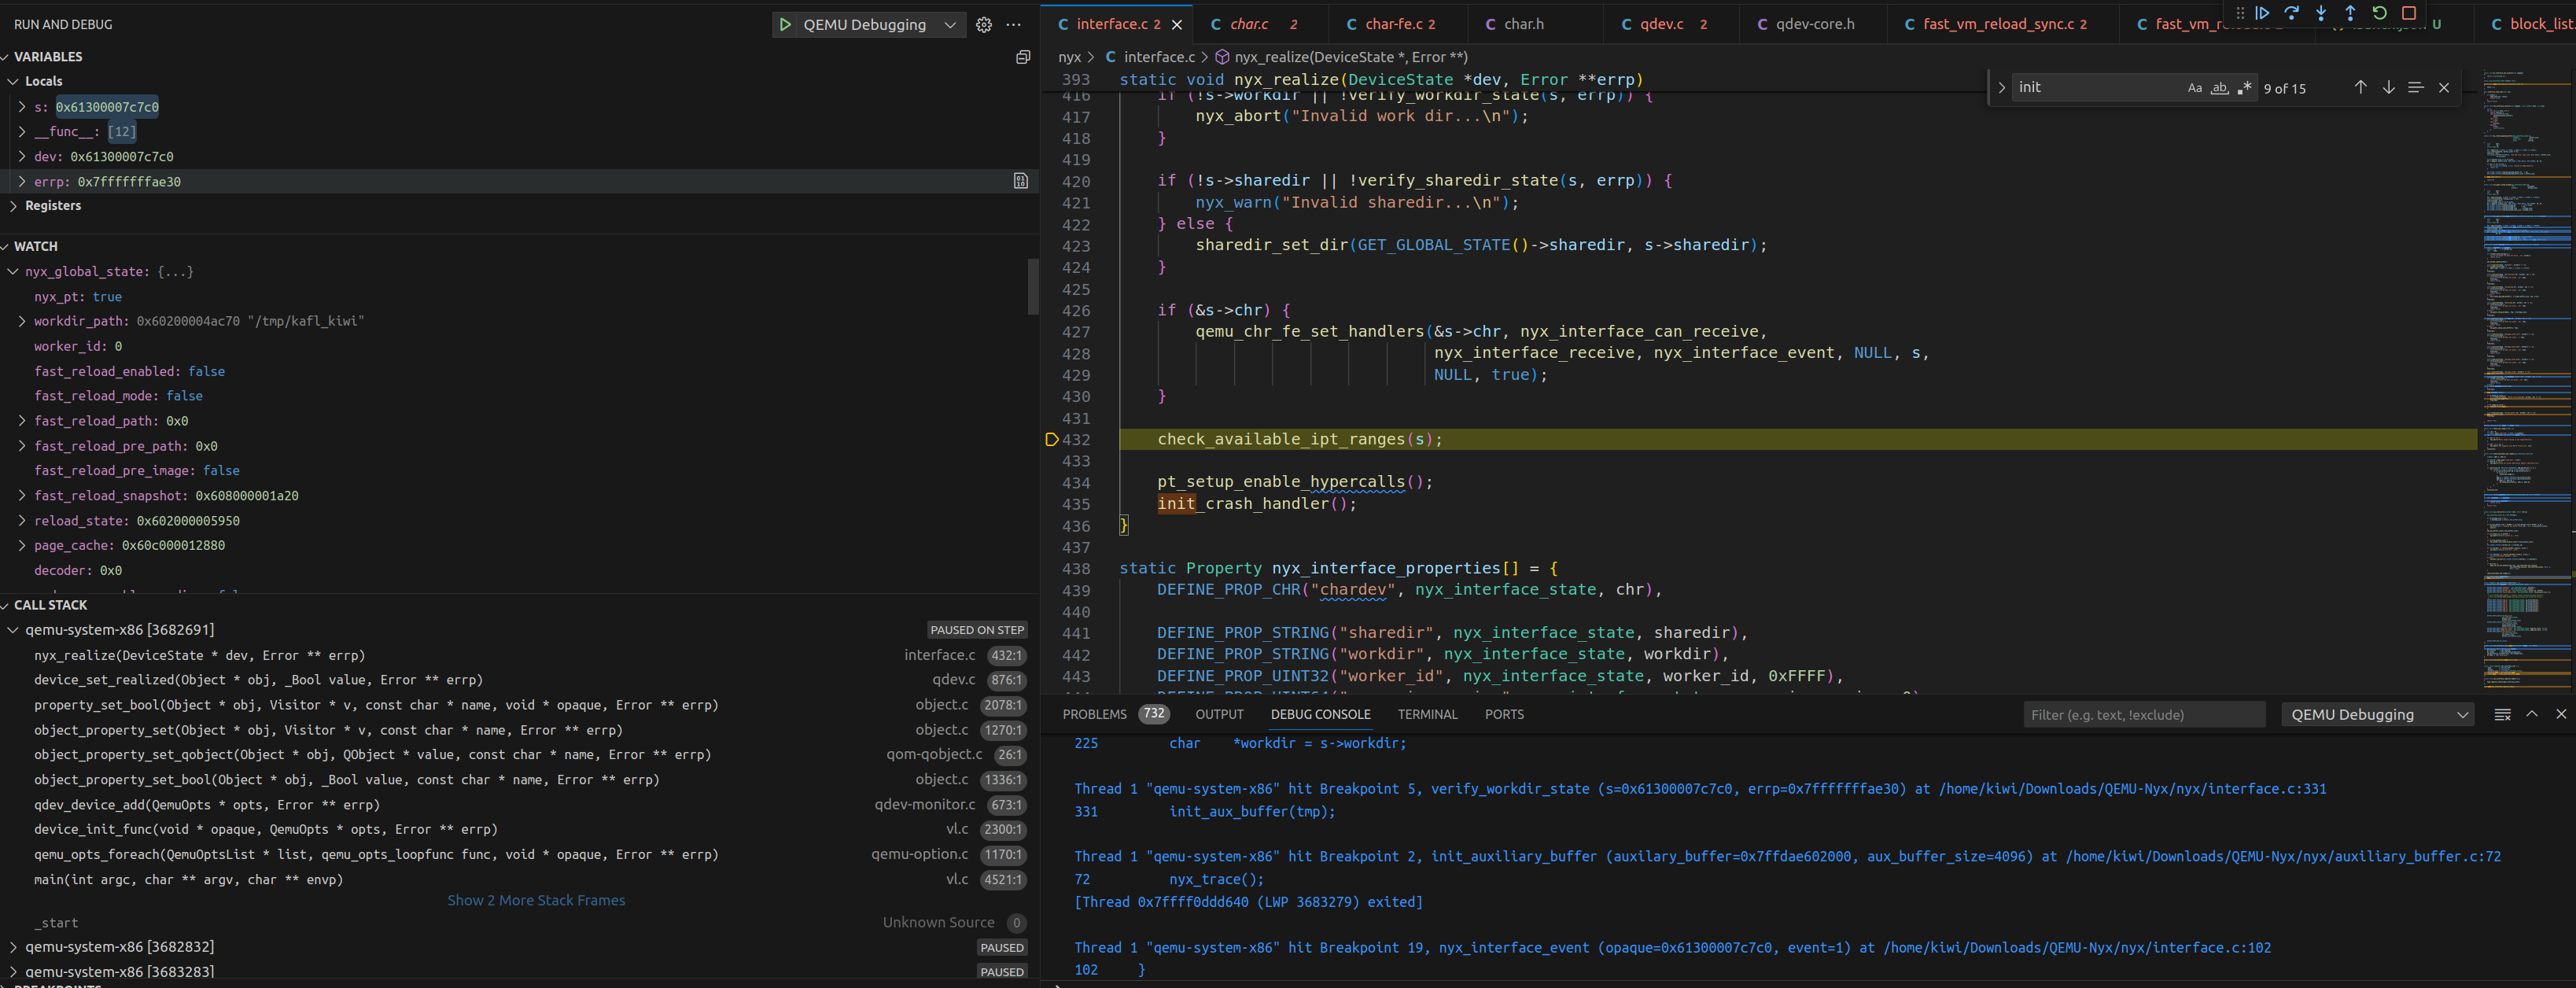
Well, we got our QEMU-Nyx running, but it’s still waiting on a actual client to supply the corpus and instruct the QEMU-Nye instance what to do.
We will again use kAFL as our “QEMU-Nyx client” to initiate all workflow for us so we can focus on debugging the QEMU-Nyx. If you don’t know how to do that yet, please check the blogpost linked above.
NOTE: When you try to inspect
Global variables, you will need to add them to theWatchtab. Ex.global_statevariable, right click on the variable andAdd to Watch.
NOTE: I had this trouble when I was inspecting the
global_stateglobal variable, but however, VS Code mapped the variable to another struct that’s in the original QEMU source code and I had to rename the Nyx’s global_state variable to something else to avoid name collision
Putting Everything Together
- Start the kAFL Fuzzer frontend
- Start the QEMU-Nyx
- Continue the execution of
QEMU-Nyxand check theworkdirto see if theinterface_Xsocket is there. This is needed by kAFL to initialize the client handshake.
- Set desired breakpoints in QEMU-Nyx and continue kAFL execution. Ex. I set a breakpoint at nyx_interface device_realize function
- Have fun learning about QEMU and Nyx\
QEMU Initialization
After setting up the debugger and mess around within the QEMU-Nyx, I found a couple of interesting spots that might worth documenting.
QEMU Class Type Registration
QEMU before starts the main function will initialize these devices into its corresponding list using QEMU Object Model (QOM), for details of the process, please see here. You can find the init_type_list variable and add it to the Watch

The list is initialized by all type_init() macros which will be called before main() thanks for the constructor attribute :
1
2
3
4
5
6
7
8
9
#define type_init(function) module_init(function, MODULE_INIT_QOM)
#define module_init(function, type)                                         \
static void __attribute__((constructor)) do_qemu_init_ ## function(void)    \
{                                                                           \
    register_module_init(function, type);                                   \
}
#endif

type_init(nyx_interface_register_types)
Summary
Each class in QEMU will call type_init to Register* themselves with QEMU and it will be inserted into init_type_list before main().
QEMU Class Template Initialization
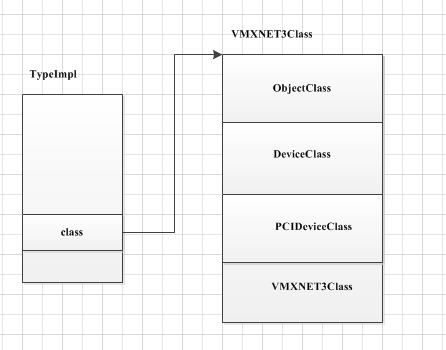
After the list has been initialized. The class will be instantiated in vl.c:main() with select_machine()-> object_class_get_list(TYPE_MACHINE, false); -> object_class_foreach(object_class_get_list_tramp,implements_type, include_abstract, &list); -> g_hash_table_foreach(type_table_get(), object_class_foreach_tramp, &data); -> Hash table iteration -> oject_class_foreach_tramp -> object.c:type_initialize (where the all objects the class inherited from .parent) will get ->ti->class_init -> nyx_interface_class_init. Here is the good graph from terenceil with an example of VMXNET3Class
Summary
During select_machine() call, all the classes that has registered with QEMU will be initialized by caling their corrsponding ##_class_init() funtions. Now with all class template has been initialized, user can now instantiate them.
QEMU Chardev Instantiation
Following the classes initialization, the main() continues to parse the user supplied devices/chardevs arguments . In the kAFL case, the first is "-chardev", "socket,server,id=nyx_socket,path=/tmp/kafl_kiwi/interface_0", which the main() has a block for initializing all chardev the user want
1
qemu_opts_foreach(qemu_find_opts("chardev"),chardev_init_func, NULL, &error_fatal);
1
2
3
4
5
6
7
8
9
10
11
12
13
14
15
qemu_opts_foreach(qemu_find_opts("chardev"),chardev_init_func, NULL, &error_fatal);

static int chardev_init_func(void *opaque, QemuOpts *opts, Error **errp)
{
    Error *local_err = NULL;

    if (!qemu_chr_new_from_opts(opts, NULL, &local_err)) {
        if (local_err) {
            error_propagate(errp, local_err);
            return -1;
        }
        exit(0);
    }
    return 0;
}
The qemu_find_opts("chardev") function is grabbing the correct list from vm_config_groups by comparing the .name, in this case “chardev”, after that it will call chardev_init_func -> qemu_chr_new_from_opts().
1
2
3
4
5
6
7
8
9
10
11
12
13
14
15
16
17
18
19
20
21
22
23
24
25
26
27
28
29
30
31
32
33
34
35
36
37
38
39
40
41
42
43
44
45
46
47
48
49
50
51
52
53
54
55
56
57
58
59
60
61
62
63
64
65
66
67
68
Chardev *qemu_chr_new_from_opts(QemuOpts *opts, GMainContext *context,
                                Error **errp)
{
    const ChardevClass *cc;
    Chardev *chr = NULL;
    ChardevBackend *backend = NULL;
    const char *name = chardev_alias_translate(qemu_opt_get(opts, "backend"));
    const char *id = qemu_opts_id(opts);
    char *bid = NULL;

    if (name && is_help_option(name)) {
        GString *str = g_string_new("");

        chardev_name_foreach(help_string_append, str);

        qemu_printf("Available chardev backend types: %s\n", str->str);
        g_string_free(str, true);
        return NULL;
    }

    if (id == NULL) {
        error_setg(errp, "chardev: no id specified");
        return NULL;
    }
	//Returns a CharDevBackend
    backend = qemu_chr_parse_opts(opts, errp);
    if (backend == NULL) {
        return NULL;
    }

    cc = char_get_class(name, errp);
    if (cc == NULL) {
        goto out;
    }

    if (qemu_opt_get_bool(opts, "mux", 0)) {
        bid = g_strdup_printf("%s-base", id);
    }

    chr = qemu_chardev_new(bid ? bid : id,
                           object_class_get_name(OBJECT_CLASS(cc)),
                           backend, context, errp);

    if (chr == NULL) {
        goto out;
    }

    if (bid) {
        Chardev *mux;
        qapi_free_ChardevBackend(backend);
        backend = g_new0(ChardevBackend, 1);
        backend->type = CHARDEV_BACKEND_KIND_MUX;
        backend->u.mux.data = g_new0(ChardevMux, 1);
        backend->u.mux.data->chardev = g_strdup(bid);
        mux = qemu_chardev_new(id, TYPE_CHARDEV_MUX, backend, context, errp);
        if (mux == NULL) {
            object_unparent(OBJECT(chr));
            chr = NULL;
            goto out;
        }
        chr = mux;
    }

out:
    qapi_free_ChardevBackend(backend);
    g_free(bid);
    return chr;
}
qemu_chr_new_from_opts will call multiple functions to setup our ChardevBackend and finally assemble the backend device with our chardev frontend. Here is the breakdown of each function:
1
2
3
4
5
6
7
8
9
10
11
12
13
14
15
16
17
18
19
20
21
22
23
24
25
26
27
28
29
30
31
32
33
34
35
36
37
38
39
40
41
42
43
44
45
46
47
48
49
50
51
52
53
54
55
56
57
58
59
60
61
62
63
ChardevBackend *qemu_chr_parse_opts(QemuOpts *opts, Error **errp)
{
Error *local_err = NULL;
const ChardevClass *cc;
ChardevBackend *backend = NULL;
const char *name = chardev_alias_translate(qemu_opt_get(opts, "backend"));
if (name == NULL) {
error_setg(errp, "chardev: \"%s\" missing backend",
qemu_opts_id(opts));
return NULL;
}
cc = char_get_class(name, errp);
if (cc == NULL) {
return NULL;
}
backend = g_new0(ChardevBackend, 1);
backend->type = CHARDEV_BACKEND_KIND_NULL;
if (cc->parse) {
cc->parse(opts, backend, &local_err);
if (local_err) {
error_propagate(errp, local_err);
qapi_free_ChardevBackend(backend);
return NULL;
}
} else {
ChardevCommon *ccom = g_new0(ChardevCommon, 1);
qemu_chr_parse_common(opts, ccom);
backend->u.null.data = ccom; /* Any ChardevCommon member would work */
}
return backend;
}
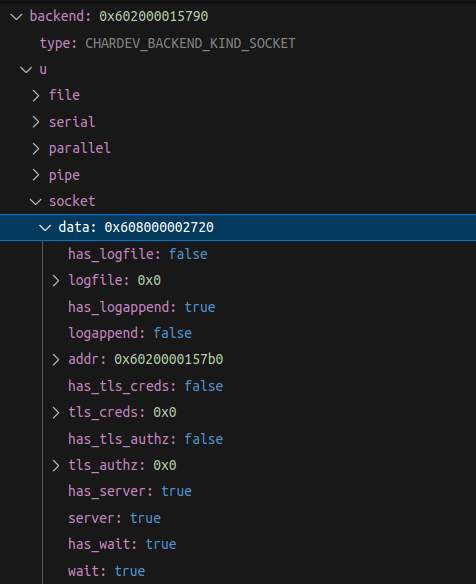
struct ChardevSocket {
/* Members inherited from ChardevCommon: */
bool has_logfile;
char *logfile;
bool has_logappend;
bool logappend;
/* Own members: */
SocketAddressLegacy *addr;
bool has_tls_creds;
char *tls_creds;
bool has_tls_authz;
char *tls_authz;
bool has_server;
bool server;
bool has_wait;
bool wait;
bool has_nodelay;
bool nodelay;
bool has_telnet;
bool telnet;
bool has_tn3270;
bool tn3270;
bool has_websocket;
bool websocket;
bool has_reconnect;
int64_t reconnect;
};
The first function called is qemu_chr_parse_opts that checks for the backend device which in our case by comparing the name with all supported type of backends. Then it will create the ChardevBackend class which wraps around the actual ChardevSocket in our case.
1
2
3
4
5
6
7
8
9
10
11
12
13
14
15
16
17
18
19
20
21
22
23
24
25
26
27
28
29
30
31
32
33
34
35
36
37
38
39
40
41
42
43
44
45
46
47
48
49
50
51
52
53
54
55
56
57
58
59
60
61
62
63
64
65
66
67
68
69
70
71
72
73
74
75
76
cc = char_get_class(name, errp);
    if (cc == NULL) {
        goto out;
    }


ObjectClass *object_class_by_name(const char *typename)
{
    TypeImpl *type = type_get_by_name(typename);

    if (!type) {
        return NULL;
    }

    type_initialize(type);

    return type->class;
}

static const ChardevClass *char_get_class(const char *driver, Error **errp)
{
    ObjectClass *oc;
    const ChardevClass *cc;
    char *typename = g_strdup_printf("chardev-%s", driver);

    oc = object_class_by_name(typename);
    g_free(typename);

    if (!object_class_dynamic_cast(oc, TYPE_CHARDEV)) {
        error_setg(errp, "'%s' is not a valid char driver name", driver);
        return NULL;
    }

    if (object_class_is_abstract(oc)) {
        error_setg(errp, QERR_INVALID_PARAMETER_VALUE, "driver",
                   "abstract device type");
        return NULL;
    }

    cc = CHARDEV_CLASS(oc);
    if (cc->internal) {
        error_setg(errp, "'%s' is not a valid char driver name", driver);
        return NULL;
    }

    return cc;
}


typedef struct ChardevClass {
    ObjectClass parent_class;

    bool internal; /* TODO: eventually use TYPE_USER_CREATABLE */
    void (*parse)(QemuOpts *opts, ChardevBackend *backend, Error **errp);

    void (*open)(Chardev *chr, ChardevBackend *backend,
                 bool *be_opened, Error **errp);

    int (*chr_write)(Chardev *s, const uint8_t *buf, int len);
    int (*chr_sync_read)(Chardev *s, const uint8_t *buf, int len);
    GSource *(*chr_add_watch)(Chardev *s, GIOCondition cond);
    void (*chr_update_read_handler)(Chardev *s);
    int (*chr_ioctl)(Chardev *s, int cmd, void *arg);
    int (*get_msgfds)(Chardev *s, int* fds, int num);
    int (*set_msgfds)(Chardev *s, int *fds, int num);
    int (*chr_add_client)(Chardev *chr, int fd);
    int (*chr_wait_connected)(Chardev *chr, Error **errp);
    void (*chr_disconnect)(Chardev *chr);
    void (*chr_accept_input)(Chardev *chr);
    void (*chr_set_echo)(Chardev *chr, bool echo);
    void (*chr_set_fe_open)(Chardev *chr, int fe_open);
    void (*chr_be_event)(Chardev *s, int event);
    /* Return 0 if succeeded, 1 if failed */
    int (*chr_machine_done)(Chardev *chr);
} ChardevClass;
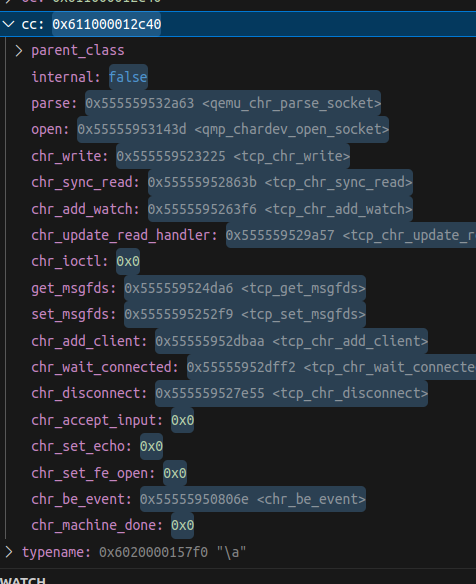
After the backend class has selected, the second function called is char_get_class() function which will first lookup the chardev-socket class with object_class_by_name(typename) during QEMU Class Template Initialization that we had previously initialized, if it’s not yet initialized then it calls type_initialize() on the spot.
Note here that all related functions are populated to the class. As you will see later, the
chardevobject does not hold any of the functions. When QEMU uses the chardev, it will first get its class and invoke the corresponding functions
Next cc = CHARDEV_CLASS(oc); which then cast the ObjectClass into ChardevClass
1
2
3
4
5
6
7
8
9
10
11
12
13
14
15
16
17
18
19
20
21
22
23
24
25
26
27
28
29
30
31
32
33
34
35
36
37
38
39
40
41
42
43
44
45
46
47
48
49
50
chr = qemu_chardev_new(bid ? bid : id,
                           object_class_get_name(OBJECT_CLASS(cc)),
                           backend, context, errp);

Chardev *qemu_chardev_new(const char *id, const char *typename,
                          ChardevBackend *backend,
                          GMainContext *gcontext,
                          Error **errp)
{
    Object *obj;
    Chardev *chr = NULL;
    Error *local_err = NULL;
    bool be_opened = true;

    assert(g_str_has_prefix(typename, "chardev-"));

    obj = object_new(typename);
    chr = CHARDEV(obj);
    chr->label = g_strdup(id);
    chr->gcontext = gcontext;

    qemu_char_open(chr, backend, &be_opened, &local_err);
    if (local_err) {
        goto end;
    }

    if (!chr->filename) {
        chr->filename = g_strdup(typename + 8);
    }
    if (be_opened) {
        qemu_chr_be_event(chr, CHR_EVENT_OPENED);
    }

    if (id) {
        object_property_add_child(get_chardevs_root(), id, obj, &local_err);
        if (local_err) {
            goto end;
        }
        object_unref(obj);
    }

end:
    if (local_err) {
        error_propagate(errp, local_err);
        object_unref(obj);
        return NULL;
    }

    return chr;
}
qemu_chardev_new() will instantiate Chardev object* using object_new() with heap allocated memory and CHARDEV() .
1
2
3
4
5
6
7
8
9
10
11
12
13
14
15
16
17
18
19
20
21
22
23
24
25
26
27
28
static void qemu_char_open(Chardev *chr, ChardevBackend *backend,
                           bool *be_opened, Error **errp)
{
    ChardevClass *cc = CHARDEV_GET_CLASS(chr);
    /* Any ChardevCommon member would work */
    ChardevCommon *common = backend ? backend->u.null.data : NULL;

    if (common && common->has_logfile) {
        int flags = O_WRONLY | O_CREAT;
        if (common->has_logappend &&
            common->logappend) {
            flags |= O_APPEND;
        } else {
            flags |= O_TRUNC;
        }
        chr->logfd = qemu_open(common->logfile, flags, 0666);
        if (chr->logfd < 0) {
            error_setg_errno(errp, errno,
                             "Unable to open logfile %s",
                             common->logfile);
            return;
        }
    }

    if (cc->open) {
        cc->open(chr, backend, be_opened, errp);
    }
}
Finally, the Chardev* char is used to get the CharDevClass cc which the class holds many function pointers related to socket communications, such as qmp_chardev_open_socket.
1
2
3
if (cc->open) {
        cc->open(chr, backend, be_opened, errp);
    }
When the ChardevClass.open field is not NULL, then the function is called. The thread is now listening for communication on the socket.
From the kAFL frontend fuzzer and we should see a new socket just got created in our $workdir

NOTE: For chardev, you can specify their backend, in our case, we selected
socketas our chardev backend. For the full supported backend options withqemu-system-x86_64 -chardev help
Summary
QEMU’s main() will parse the user arguments to instantiate chardev devices and call its open function if it has one.
QEMU Device Instantiation
Similar to Chardev, another function is called in main():
1
2
3
4
if (qemu_opts_foreach(qemu_find_opts("device"),
                      device_init_func, NULL, NULL)) {
    exit(1);
}